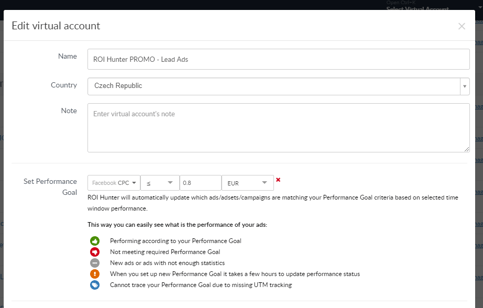
Now you can easily visualize which campaigns work based on the performance goals that you set. No more endless filtering if the campaign works today but was not working yesterday or if it is too young or if it is prospecting, re-marketing etc. Sure, you can add filter upon filter to find but a simple thumbs up or thumbs down will save you time and maybe your mind as well.
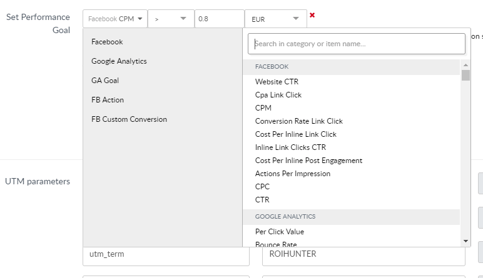
As with other features on our platform, it is not Facebook exclusive. Google Analytics E-Commerce goals as well as Google Analytics goals available along with all of Facebook’s metrics and action metrics. It is also possible to use the KPIs from AppsFlyer, Adjust, ApSalar and other measurement partners that we already integrated.
Once you pick which performance goal you want to compare, pick the time frame you want our application to measure:
- This week
- 7days
- 28days
- Last Week
- Last Month
- Lifetime
- This month
What this means for you:
- A highly visual, simple and fast way to weed out failing campaigns
- Stop campaigns, ad sets and ads that are not working to opt for those that do work disregarding campaigns that do not have enough data to prove itself yet.
- Automate your campaigns based on the goals that you determine
How it works:
- On the virtual account level, click on the blue pencil to edit the virtual account.

- Next to “Select performance goal” click on the goal that makes the most sense for that account. For instance, if you have a virtual account for a specific part of the marketing funnel, then choose a goal that reflects that funnel section.
For example, a virtual account that is geared towards the conversion stage of the marketing funnel might have a goal of an ROI of 6 or higher. However, an awareness stage virtual account might have a goal for a Website CTR of greater than 2% or a CPC that is lower than 0.07 EUR.

- Click “Save Changes”
The changes usually take a couple of hours to become live. While this happens you will see an orange exclamation sign.

By default the goals are set on a lifetime basis to change this or add more time frames to compare:
- Click on “Customize View”
- Search for goal and when “Campaign Goal” comes up move the block over to the right-hand column.
- Click on “Lifetime” and pick what time frame you would prefer.
Add as many time frames as you need. If you would like to apply the same or different time frames to at the ad set or ad level, then click on those tabs and apply the time frames there.
And that’s it! Once you’re done you can see which campaign, ad sets or ads work. Save time for better optimization.
Automate Your Goals
The great thing about this is that you can also automate your goals.
If for example, you wish to stop an ad that is not performing or increase its spend based on your conditions, then you can set those conditions in automatic rules:
- Click on “Conditions”
- Search for “Campaign Goals”
- And pick which time-frame you want to automate
Result Interpretation:
- 0 means a negative correlation
- 1 means average results
- 10 means a positive result
Click the action you want to take and you’re done.
Best Practice:
- Arrange your Virtual Account around a marketing strategy. If you have a VA that is structured around your target markets or part of the funnel then you can easily pick a performance goal that makes sense for all of your ads in that VA and not just some.


