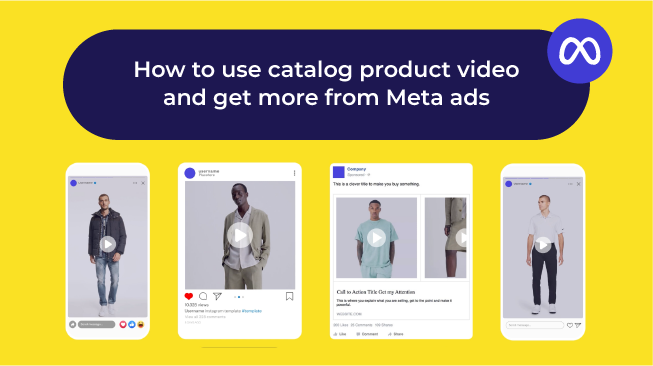
What are Dynamic Ads?
Dynamic Ads intelligently expose new users to items they are most likely to buy, allowing brands to promote their full catalogs and continuously improve their campaigns without having to configure each product ad individually. This makes Dynamic Ads the perfect tool for Re-marketing, converting e-shops that want to stay ahead of the game.
Not many people know, however, that Dynamic Ads are perfect for ultra-efficient automated prospecting campaigns. The challenge many advertisers face is that product catalogs used for re-marketing with Dynamic Ads are not ideal for prospecting. The reason for that is that displaying product images or landing users on product-specific pages doesn’t usually work well for advertising to first-time customers.
To solve this, we created a 5-step hack that will let you easily create prospecting feeds with perfect images and landing pages for attracting new customers.
Before you start:
Use Google Sheets to create the product feed. Managing a longer feed is too time-consuming, so make sure your product list is not too long.
Step 1: Creating the Feed Structure
Your Google Sheet should store information that you want to use for Dynamic Ads. Don’t worry about specific naming formats, just include any labels that matter to your business. To start off, here is an example of tags you could use:
- Category
- ID
- Title (used as a headline in the creative)
- Post text (used for the copy above the image in the creative)
- Description text (shown below the headline)
- Destination URL
- Destination URL with UTMs (automatically adding UTM with product ID)
- Image URL
- Targeting gender
- Targeting language
- Custom label
So your document structure will look something like this:

Step 2: Filling in the Feed
Once the tags are in your Google Sheet, you just need to put in the relevant product info.
A link for an individual product image is mandatory. PRO TIP: Instead of linking particular product pages, send visitors to the whole product category.
We recommend creating two feeds with different images: one that contains links to images cropped for News Feed ads, and another one with square-shaped images for Carousel ad types. PRO TIP: In ROI Hunter you can also use dynamic templates that will transform the images for the right placements right from the product catalog, you can read more about using dynamic templates for e-commerce in our case study.
Step 3: Publishing the Feed
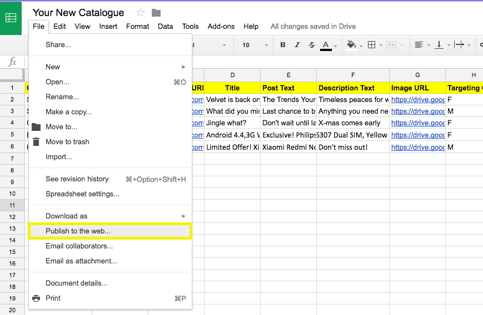
Once you have created the table, go to File –> select Publish to the web from the scroll-down menu.
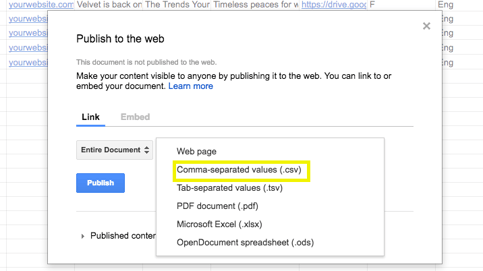
Select publishing in CSV format from the options.
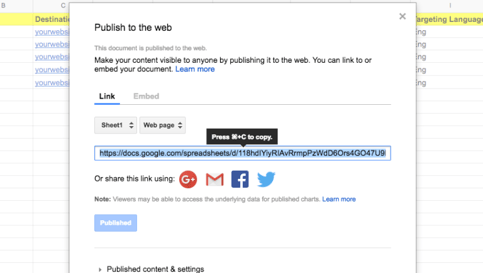
This created a link to your new feed. Copy the URL and keep it at hand.
Step 4: Linking the Feed to ROI Hunter
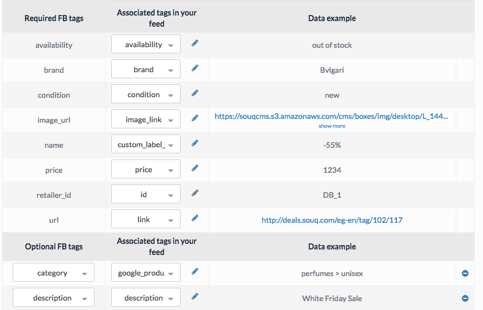
Now you need to upload and map the tags from your Google Sheet to the ones recognized by Facebook. This is required for your feed to be interpreted correctly.
Go to ROI Hunter –> Select Tools –> Feeds –> Add A New Product Feed, and paste the URL of your Google Sheet.
Step 5: Create your Campaign
Go to Create Campaign –> Select “Promote a product catalog” –> Select your newly created uploaded feed from the drop-down menu.
You can select a category and then filter out products by attributes, such as ‘price’ or ‘custom label’. For example, if you have set up a product set with filter ‘custom label’ as ‘flash sale’, whenever you will add a term ‘flash sale’ into Google Sheets custom label column, the products will be synced automatically as the feed is updated every hour. Categories will also be conveniently grouped into a tree structure for you to find your way around them.
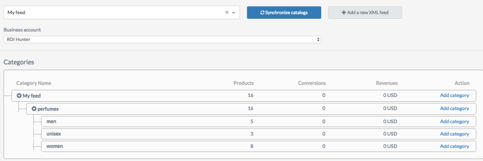
Finally, pick the right audience to target the prospecting campaigns to. Dynamic Prospecting usually works best with lookalike audiences based on your existing customers. Check campaign settings first, click “Send” and Voila, your prospecting ads are all done!
The cool thing is that, once set up, automated prospecting ads are very easy to manage. Whatever you change in a Google Sheet will automatically update the ads. All changes can be done and implemented instantly by anyone in your team.
If you are starting out with your ads today, don’t forget to optimize them according to our Seeds Strategy for better results.
Want to start automated prospecting campaigns today? Sign up to our free trial and get your audience acquisition machine going.

